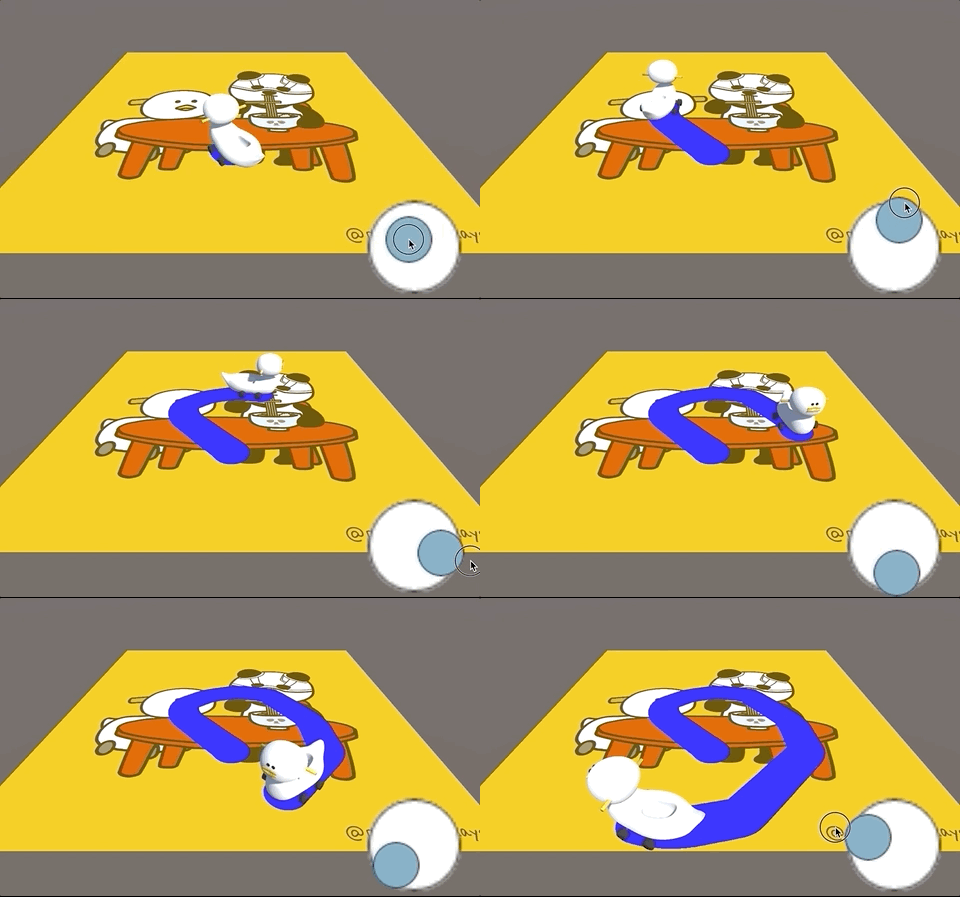
以下のように、オブジェクトが通ったところの地面のUV座標をとってペイントする方法です🐼
オブジェクトの表面のUVの値をとる
まずはオブジェクトのUV値をとる方法です。
オブジェクトのUV値は
textureCoord
で取得できます。レイを飛ばして、ヒットした位置のtextureCoordをとることで、オブジェクトのUV値を取得します。
void Update()
{
    if (!Input.GetMouseButtonDown(0)) return;

    var ray = Camera.main.ScreenPointToRay(Input.mousePosition);
    RaycastHit hit;

    if (Physics.Raycast(ray, out hit))
    {
        Vector2 pixelUV = hit.textureCoord;
        Debug.Log("pixelUV:::" + pixelUV.x + " , " + pixelUV.y);
    }
}
このようにUV値を取得できます。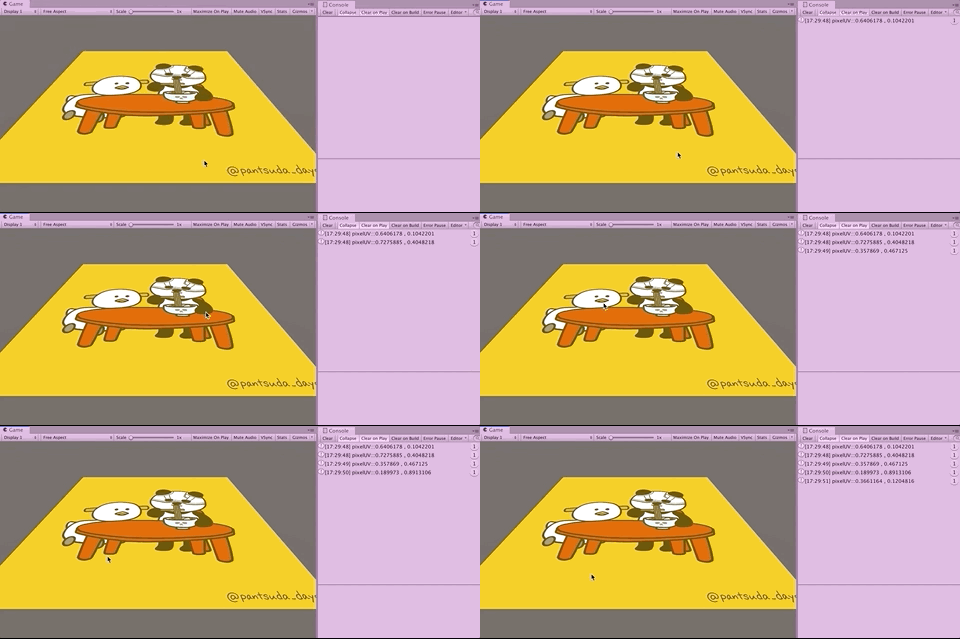
オブジェクトの表面に色をつける
🐼準備をする🐼
UV値をとって、その場所に色をつけていきます。
Planeを用意し、テクスチャを貼り付けます。
次に、ペイントをする対象のオブジェクトにMeshColliderをつけます。
MeshColliderじゃないとtextureCoordが値を取得できないみたいです。
また、ConvexやIsTriggerにはチェックを入れないでください。これにチェックを入れると値を取得してくれませんでした。
※他のブログでは、テクスチャの設定でRead/Writeにチェックを入れると書いているものや、他にもいくつか設定をしているものもありましたが、Read/Writeにチェックを入れるとRead用・Write用のテクスチャが確保されるため容量が倍になるので重たくなるみたいです。
この記事ではテクスチャの設定を変えずにできる方法で書いています。
🐼スクリプトを書いてセットする🐼
新しくスクリプトを作り、Brushという名前にして以下のスクリプトを貼り付けます。
using System.Collections;
using System.Collections.Generic;
using UnityEngine;

public class Brush : MonoBehaviour
{
    public int brushWidth = 150;
    public int brushHeight = 150;
    public Color color = Color.blue;

    public Color[] colors{get; set;}

    public void UpdateBrushColor()
    {
        colors = new Color[brushWidth * brushHeight];
        for (int i = 0; i < colors.Length; i++)
        {
            colors[i] = color;
        }
    }
}
次に、UV_Painterという名前のスクリプトを作り、以下を貼り付けます。
using System.Collections;
using System.Collections.Generic;
using UnityEngine;

public class UV_Painter : MonoBehaviour
{
    [SerializeField]
    private Brush _brush;

    [SerializeField]
    private GameObject _paintObj;

    private Texture2D _tex;


    void Start()
    {
        _tex = new Texture2D(_paintObj.GetComponent<Renderer>().material.mainTexture.width, _paintObj.GetComponent<Renderer>().material.mainTexture.height);
        Graphics.CopyTexture(_paintObj.GetComponent<Renderer>().material.mainTexture, 0, 0, _tex, 0, 0);
        _brush.UpdateBrushColor();
    }

    void Update()
    {
        if (!Input.GetMouseButton(0)) return;

        var ray = Camera.main.ScreenPointToRay(Input.mousePosition);
        RaycastHit hit;

        if (Physics.Raycast(ray, out hit))
        {
            Renderer renderer = hit.collider.gameObject.GetComponent<Renderer>();
            MeshCollider meshCollider = hit.collider as MeshCollider;

            if (renderer == null || renderer.sharedMaterial == null || renderer.sharedMaterial.mainTexture == null || meshCollider == null)
            {
                Debug.Log("NULL");
                return;
            }

            Vector2 pixelUV = hit.textureCoord;
            pixelUV.x *= _tex.width;
            pixelUV.y *= _tex.height;
            // Debug.Log("pixelUV:::" + (int)pixelUV.x + " , " + (int)pixelUV.y);

            _tex.SetPixels((int)pixelUV.x - _brush.brushWidth/2, (int)pixelUV.y - _brush.brushHeight/2, _brush.brushWidth, _brush.brushHeight, _brush.colors);
            _tex.Apply();
            renderer.material.mainTexture = _tex;
        }
    }
}
空のゲームオブジェクトを2つ作り、それぞれにそれぞれのスクリプトを貼り付けます。
インスペクターを見るとBrushの方はブラシのサイズと色を決めれるようになっています。
UV_Painterの方は、インスペクタからBrushと色をつける対象のものをドラッグアンドドロップでセットしておきます。

これで実行すると、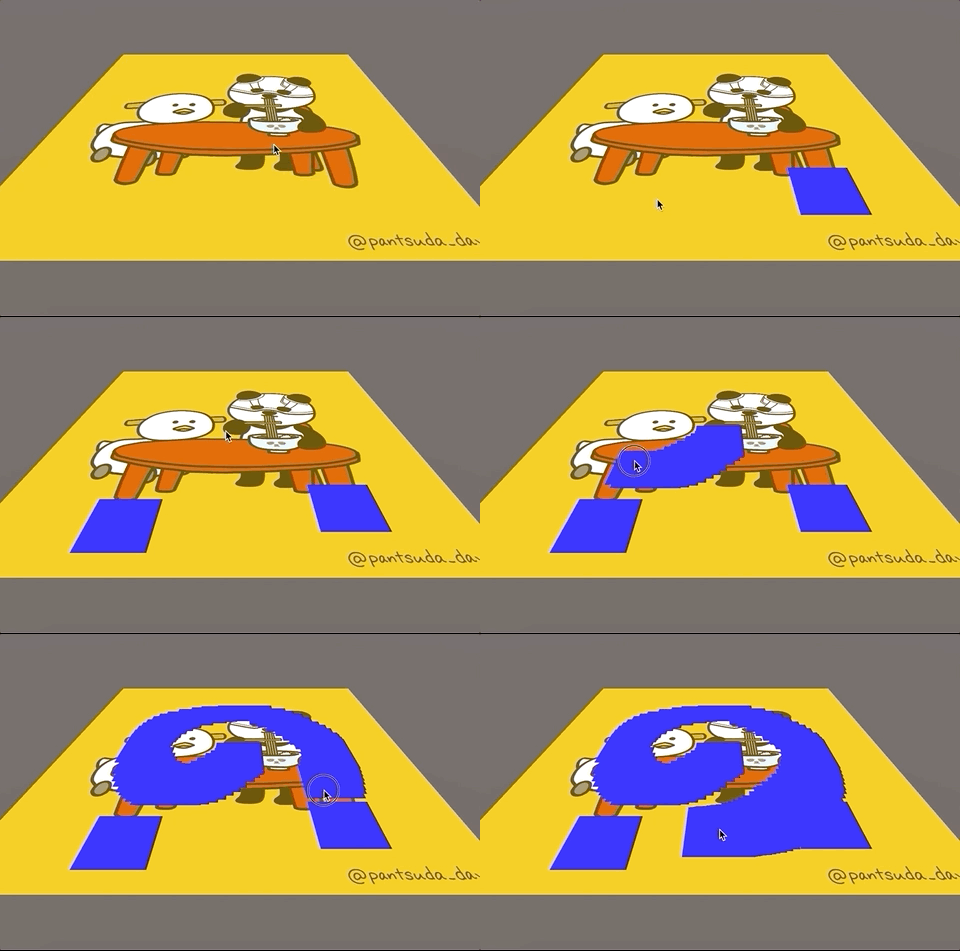
おお、いい感じですね。
ペンを細くしたらいい感じにペイントアプリっぽいですね。
🐼ここまでのスクリプト解説
【Brush.cs】
ブラシを作るクラスです。
Colorの配列の数をブラシの面積分の数にして、そこにインスペクタから設定したcolorを入れています。
public void UpdateBrushColor()
{
    colors = new Color[brushWidth * brushHeight];
    for (int i = 0; i < colors.Length; i++)
    {
        colors[i] = color;
    }
}
【UV_Painter.cs】
_tex = new Texture2D(_paintObj.GetComponent<Renderer>().material.mainTexture.width, _paintObj.GetComponent<Renderer>().material.mainTexture.height);
スタートでペイントをする対象のオブジェクトにセットしてあるテクスチャと同じサイズのテクスチャ2Dを作ります。
Graphics.CopyTexture(_paintObj.GetComponent<Renderer>().material.mainTexture, 0, 0, _tex, 0, 0);
そのあと、Graphics.CopyTexture()で元のテクスチャをコピーして先ほど作成したテクスチャ2Dに入れています。Graphics.CopyTextureの引数は
Graphics.CopyTexture(コピー元のテクスチャ、コピー元テクスチャの要素、コピー元テクスチャのミップマップレベル、コピー先テクスチャ、コピー元テクスチャの要素、コピー先テクスチャのミップマップレベル)
です。公式リファレンスはこちら
docs.unity3d.com
コピー元テクスチャの要素とコピー先テクスチャの要素は何かよくわかりません。おそらく「複数枚のテクスチャを含むテクスチャオブジェクト」を渡してもコピーできるようになってるとかそういうやつっぽいです。
ミップマップは簡単に言うと「節約のための機能」です。
3Dの場合「遠くのオブジェクト」はサイズが小さくなってあまりわからないものになるので、それをレンダリングするときに真面目にテクスチャを使うのは勿体無いですよね、3Dではテクスチャはリソース的にとても重いので、できるだけ軽く節約したいです。そういうときにmip mapレベルを下げて小さいテクスチャを使用し、負荷を軽減するのがミップマップの仕組みです。
mip mapをひとつ下げるとテクスチャは1/4になります。(縦半分、横半分で、1/4)。
mip map0が元のテクスチャで、mip map1が1/4、で、mip map2は1のさらに1/4、って小さくなっていきます。
ここでは一旦0にしておきます。
で、なぜここで元のテクスチャをコピーするかというと、お絵かきの流れとしてここで作ったテクスチャ2Dに色をつけたものをテクスチャとして最終的にオブジェクトにセットするので、テクスチャ2Dを作っただけだと元の絵柄は反映されず真っ白な状態になってしまいます。
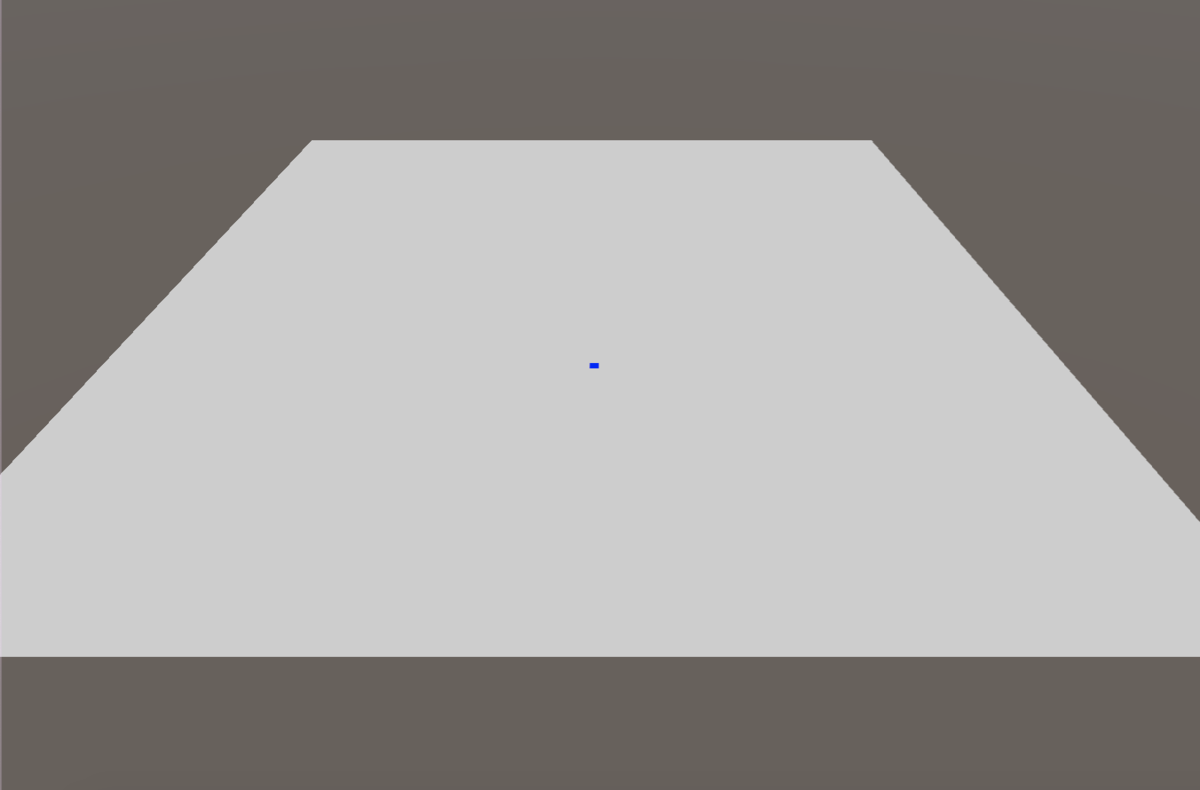
元の絵柄の上に絵を書くために、元の絵柄をコピーして新しく作ったテクスチャ2Dに貼り付けておく、ということです。
続いて、
Vector2 pixelUV = hit.textureCoord;
pixelUV.x *= _tex.width;
pixelUV.y *= _tex.height;
ここでは、hit.textureCoordでヒットした所のUV座標を取っています。
hit.textureCoordでは値が0から1で帰ってくるので、それをテクスチャのサイズ分だけ乗算してピクセルの座標の値に変換しています。
_tex.SetPixels((int)pixelUV.x - _brush.brushWidth/2, (int)pixelUV.y - _brush.brushHeight/2, _brush.brushWidth, _brush.brushHeight, _brush.colors);
_tex.Apply();
renderer.material.mainTexture = _tex;
SetPixels()でピクセルを塗り替えます。
引数は
SetPixels(int ピクセル座標のx、int ピクセル座標のy、int 塗りたいピクセルの範囲x、int 塗りたいピクセルの範囲y、Color配列);
です。pixel.UVから_brush.brushWidth/2を引いているのは、ブラシの中心をタップの位置に合わせるためです。指定した位置から縦と横にピクセルの範囲を塗るので、pixelUV(タップ位置)をそのまま渡してしまうとタップ位置から横と縦にピクセルの色を塗ることになります。タップした位置を真ん中にして色をつけて欲しいので、指定位置を縦と横にそれぞれの長さ半分ずつずらすことで、タップいちを真ん中にして色をつけてくれます。
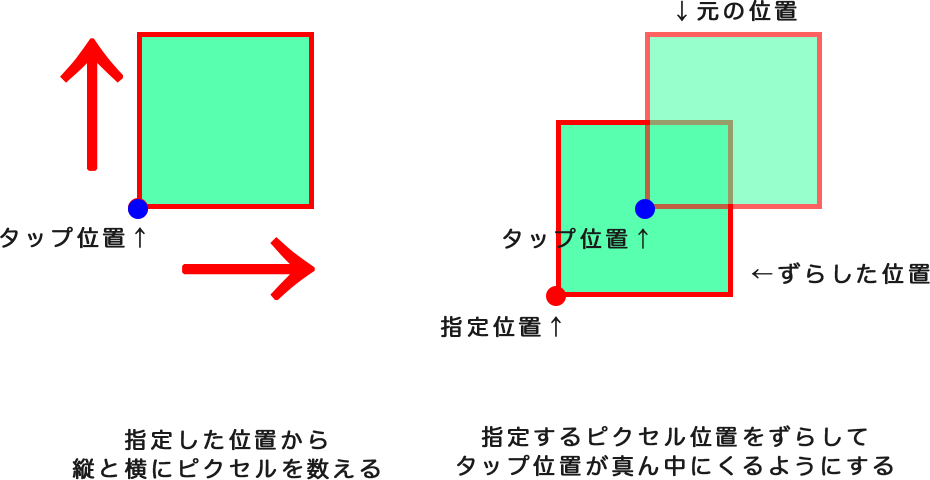
最後に_tex.Applyで適用し、ペイント対象オブジェクトのメインテクスチャにセットしています。
_tex.Apply();
renderer.material.mainTexture = _tex;
ブラシの形を丸くする
🐼四角の中に丸を書く
ブラシの形が四角だと、なんだかペンっぽくないしカクカクして微妙な感じです。
なので、これを丸くしましょう。
Brush.csの中に少し書き加えます。
private Color colorOutSide = Color.black;   //color の下に付け足す

public void UpdateBrushColor()
{
    Vector2 center = new Vector2(brushWidth / 2, brushHeight / 2);
    colors = new Color[brushWidth * brushHeight];

    for (int i = 0; i < colors.Length; i++)
    {
        float x = i % brushWidth;
        float y = Mathf.Floor(i / brushWidth);
        Vector2 pixelPos = new Vector2(x, y);
        float dist = Vector2.Distance(pixelPos, center);

        if (dist < brushWidth / 2)
        {
            colors[i] = color;
        }
        else
        {
            colors[i] = colorOutSide;
        }
    }
}
これで実行してみると、黒い四角の中に丸が現れます。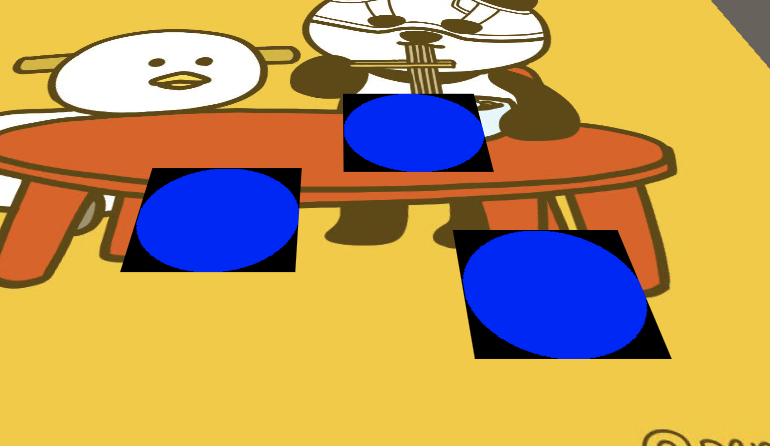
丸が作れました。あとはこの黒い部分を透明にすればいけそうです!
その前にここまでのコードを解説しておきます。
Vector2 center = new Vector2(brushWidth / 2, brushHeight / 2);

for (int i = 0; i < colors.Length; i++)
{
    float x = i % brushWidth;
    float y = Mathf.Floor(i / brushWidth);
    Vector2 pixelPos = new Vector2(x, y);
    float dist = Vector2.Distance(pixelPos, center);

....
まずブラシの四角の中で、真ん中の位置を求めてVector2 centerの中に入れています。
そして、for文の中で、今処理をしようとしているピクセルが、ブラシの真ん中からどのくらいの距離に位置しているのかを求めます。
求めるのですが、
そのままだとブラシの中のピクセルはただの配列になっていて、真ん中からの距離を求めにくいです。なので、現在処理しようとしているのピクセルの位置をXとYという座標に変換し、真ん中からの距離を求めます。以下の図をご覧ください。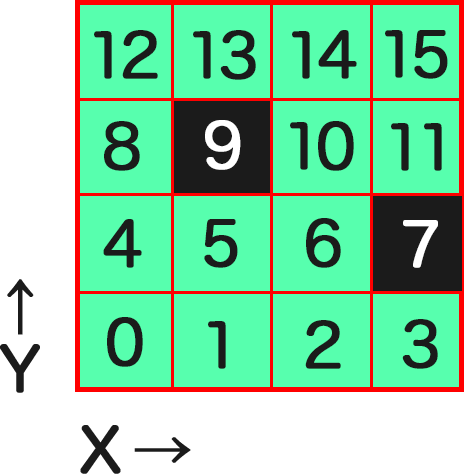
例えば4X4のブラシだったとします。
描画する順番で0、1、2とピクセルに配列番号が与えられています。
現在処理しようとしているピクセル(for文のi番)の7番を求めたいときに、ブラシの横幅サイズの4で割ってみると
7÷4= 1あまり3
になります。
同じように9番のピクセルを計算してみます。
9÷4= 2あまり1
です。
割った答え部分がY軸の位置の値、あまりの数がX軸の位置の値になっています。
これをコードにして、以下のようになっています。
Mathf.Floor()は少数点を切り捨てて整数部分だけを求める関数です。
これで現在処理しようとしているピクセルのXとYの値が求まったのでそれをVector2に格納しています。
float x = i % brushWidth;
float y = Mathf.Floor(i / brushWidth);
Vector2 pixelPos = new Vector2(x, y);
そして求めたピクセルのポジションがセンターからどのくらいにあるかを
Vector2.Distance(ポジションA, ポジションB)で求め、距離がbrushWidth/2より小さければ青、大きければ黒にすることで、半径がブラシサイズの半分の円ができます。
float dist = Vector2.Distance(pixelPos, center);

if (dist < brushWidth / 2)
{
    colors[i] = color;
}
else
{
    colors[i] = colorOutSide;
}
🐼黒い部分を透過する
オブジェクトの透過について
続いて、黒い部分を透過させていきます。
ClolorにColor.clearがあるのでそれでいいんじゃないの?と思うかもしれませんが、それにするとそのまま下の色も透過してしまい、下のUnityデフォルトの地面が見えてしまいます。
なぜかというと、SetPixelsは「その色」に完全に上書きするので、透過しても「その下の色は完全に無視して」上書きします。なので下の黄色を無視して透過してしまってるため地面が見えてる状態になってるんですね。
3DCGでの透過の仕組みは、ディスプレイという平面に出力するときに、アルファ値の値を元に「重なる色を合成して」「新しい色を作って」います。つまり下のテクスチャ(塗る前の色)の上に透過を再現する場合は「前のテクスチャの色」と「塗りたい色」を混ぜる必要があります。
なのでBrush.csとUV_Painter.csを以下のように書き加えます。
【Brush.cs】
public void UpdateBrushColor(Color[] previousCol = null)   //引数を付け足す
{
        ////(中略)////

        if (dist < brushWidth / 2)
        {
            colors[i] = color;
        }
        else
        {
            //ここから
            if(previousCol != null)
            {
                colors[i] = colorOutSide + previousCol[i];
            }
            //ここまで書き足す
        }
    }
}
【UV_Painter.cs】
//////SetPixels()の前にここから
Color[] col = new Color[_brush.colors.Length];
col = _tex.GetPixels((int)pixelUV.x-_brush.brushWidth/2, (int)pixelUV.y-_brush.brushHeight/2, _brush.brushWidth, _brush.brushHeight);
_brush.UpdateBrushColor(col);
//////ここまでを付け足す
_tex.SetPixels((int)pixelUV.x - _brush.brushWidth/2, (int)pixelUV.y - _brush.brushHeight/2, _brush.brushWidth, _brush.brushHeight, _brush.colors);
_tex.Apply();
renderer.material.mainTexture = _tex;
これで実行してみましょう。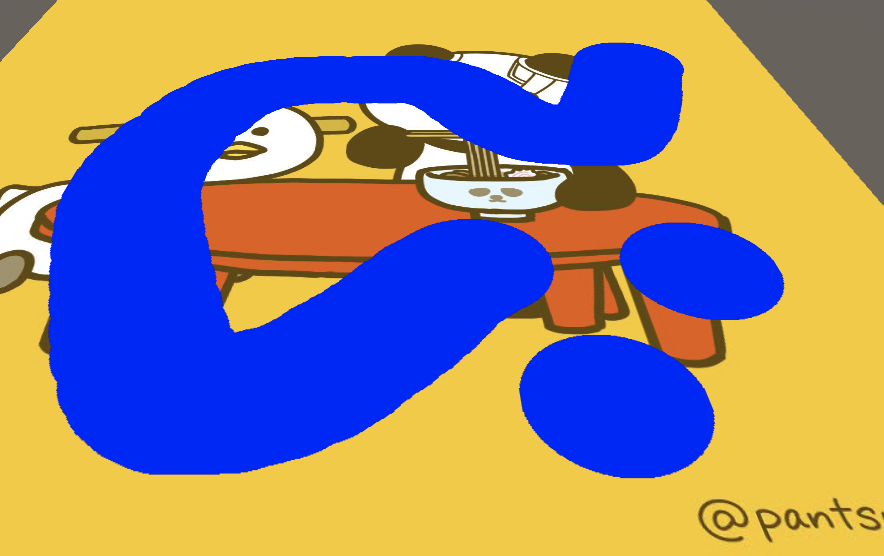
スクリプト解説
【Brush.cs】
public void UpdateBrushColor(Color[] previousCol = null) //引数を付け足す
塗る前の色をColor配列で受け取ります。
colors[i] = colorOutSide + previousCol[i];
丸の外側の色(重ねる側の色)と塗る前の色(重ねられる側の色)を加算することで合成を行なっています。
重ねる側の色を黒にしているのでrgbが(0.0, 0.0, 0.0)、下の色のrgbが例えば(1.0, 0.0, 0.0)の赤色だったとすると、アルファ値を1.0にした場合
(0.0, 0.0, 0.0) * 1.0 + (1.0, 0.0, 0.0) * 1.0
になるので、赤色になりますね。なので、重ねる側の色は黒色にしてあります。
【UV_Painter.cs】
Color[] col = new Color[_brush.colors.Length];
col = _tex.GetPixels((int)pixelUV.x-_brush.brushWidth/2, (int)pixelUV.y-_brush.brushHeight/2, _brush.brushWidth, _brush.brushHeight);
_brush.UpdateBrushColor(col);
SetPixels()の前に付け足した部分です。
「塗る前の色」を入れるためのカラー配列を作り、そこにGetPixels()でブラシと同じ範囲のピクセルの色を取得しています。 もちろん配列のサイズはブラシのColor配列と同じ数です。
#2196f3">GetPixels()引数は
GetPixels(int ピクセル座標のx、int ピクセル座標のy、int 塗りたいピクセル範囲x、int 塗りたいピクセル範囲y);
です。
それをBrushクラスのUpdateBrushColor(Color[] previousCol = null)の引数に渡して上げることで、塗る前の色とブラシの色を合成することができます。
この一連の流れの後にSetPixels()を実行すると合成された後の丸いブラシが塗られるわけです。
オブジェクトが通ったところに色をつける
あとは今クリックしたところに色をつけるようになっているので、オブジェクトが通ったところに色をつけるように変更します。
やり方としては、現在タップしたところからレイを出しているのを、オブジェクトから下向きにレイが出るようにします。
UV_Painter.csを少し書き換えます。
【UV_Painter.cs】
[SerializeField]
private GameObject _brushObj;   //付け足す

(中略)

//レイの宣言を書き換える
var ray = new Ray(_brushObj.transform.position, new Vector3(0, -1, 0));
これで絵を描く側になるオブジェクトをインスペクタから設定すれば完了です。
また、今回の例ではジョイスティックでキャラクターを動かす仕様にしています。
ジョイスティックの実装には以下の記事をご覧ください。
www.wwwmaplesyrup-cs6.work
これで無事おまるが通った跡をペイントすることができました。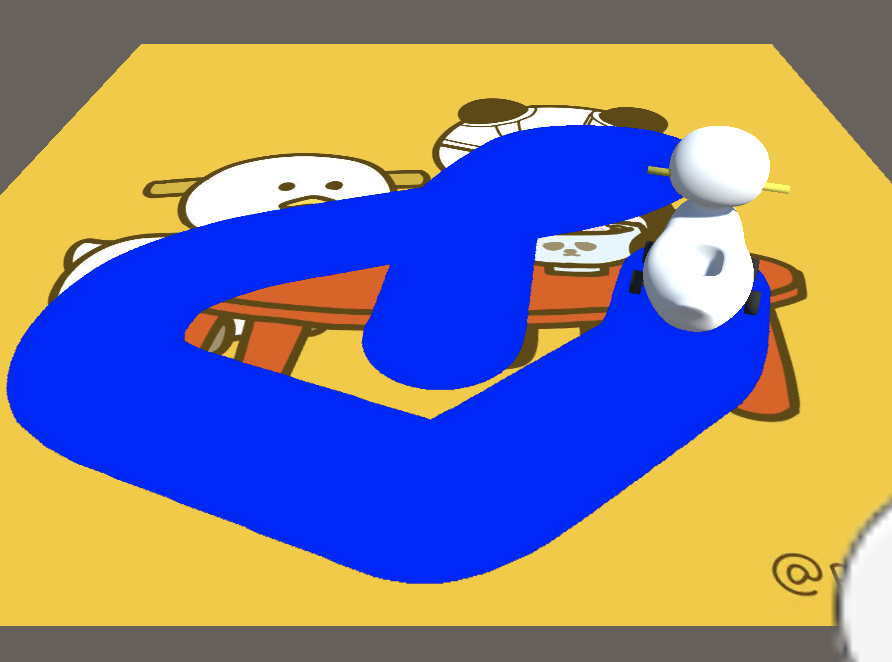
UVの値をとってるので、平面じゃなくてもオッケーです。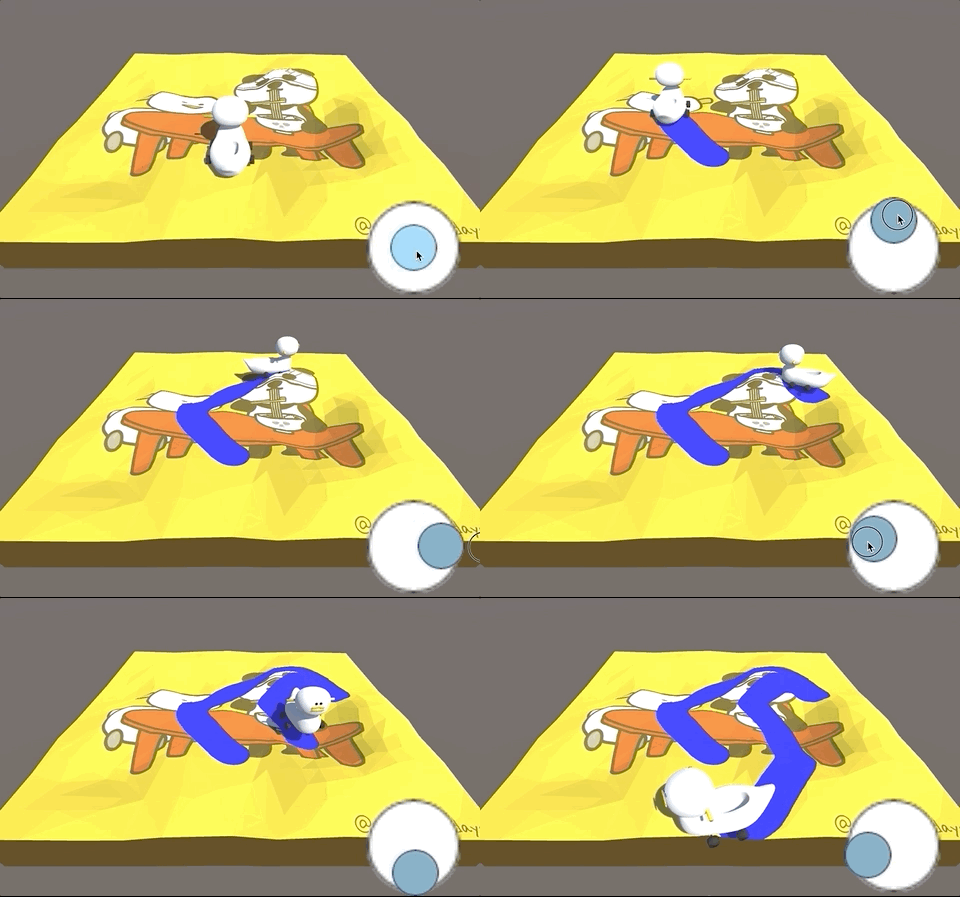
まとめなど
実装に関しては以上です。
ただ、GetPixels()やSetPixels()は重たい処理なのでShaderでやるのが一番良さそうですというのがまとめです(ここまで解説しておいて、おい)。
また、この実装なんですが、端っこの方まで行ってブラシサイズがテクスチャからはみ出すとエラーが出ます。
また、形がややこしいオブジェクトにペイントしようとすると、多分UV展開図の問題でペイントの丸が切れてしまったりとかもします。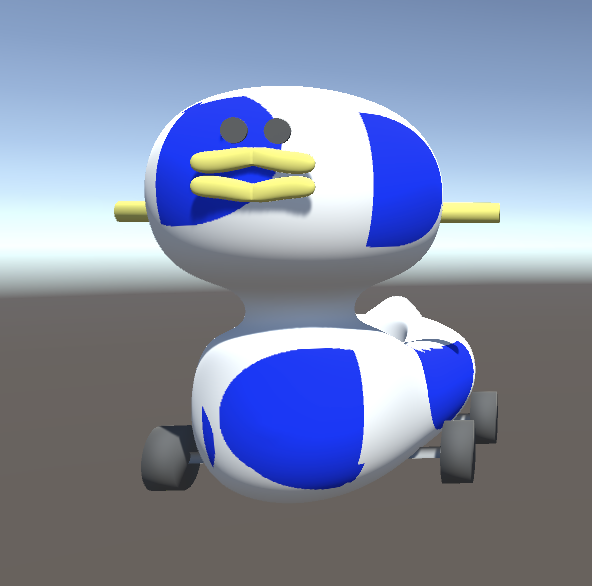
この辺含めてShaderでやる方がうまくいきそうな気がする...
誰かいい方法わかる方いたら教えてください!
Shaderで試した際にはまた記事にしようと思います。
以上!
全スクリプト
【Brush.cs】
using System.Collections;
using System.Collections.Generic;
using UnityEngine;

public class Brush : MonoBehaviour
{
    public int brushWidth = 150;
    public int brushHeight = 150;
    public Color color = Color.blue;
    private Color colorOutSide = Color.black;

    public Color[] colors{get; set;}

    public void UpdateBrushColor(Color[] previousCol = null)
    {
        Vector2 center = new Vector2(brushWidth / 2, brushHeight / 2);
        colors = new Color[brushWidth * brushHeight];

        for (int i = 0; i < colors.Length; i++)
        {
            float x = i % brushWidth;
            float y = Mathf.Floor(i / brushWidth);
            Vector2 pixelPos = new Vector2(x, y);
            float dist = Vector2.Distance(pixelPos, center);

            if (dist < brushWidth / 2)
            {
                colors[i] = color;
            }
            else
            {
                if(previousCol != null)
                {
                    colors[i] = colorOutSide + previousCol[i];
                }
            }
        }
    }
}
【UV_Painter.cs】
using System.Collections;
using System.Collections.Generic;
using UnityEngine;

public class UV_Painter : MonoBehaviour
{
    [SerializeField]
    private Brush _brush;

    [SerializeField]
    private GameObject _brushObj;

    [SerializeField]
    private GameObject _paintObj;

    private Texture2D _tex;


    void Start()
    {
        _tex = new Texture2D(_paintObj.GetComponent<Renderer>().material.mainTexture.width, _paintObj.GetComponent<Renderer>().material.mainTexture.height);
        Graphics.CopyTexture(_paintObj.GetComponent<Renderer>().material.mainTexture, 0, 0, _tex, 0, 0);
        _brush.UpdateBrushColor();
    }

    void Update()
    {
        if (!Input.GetMouseButton(0)) return;

        // var ray = Camera.main.ScreenPointToRay(Input.mousePosition);   //クリック位置からレイと飛ばす場合
        var ray = new Ray(_brushObj.transform.position, new Vector3(0, -1, 0));    //オブジェクトからレイを飛ばす場合
        RaycastHit hit;

        if (Physics.Raycast(ray, out hit))
        {
            Renderer renderer = hit.collider.gameObject.GetComponent<Renderer>();
            MeshCollider meshCollider = hit.collider as MeshCollider;

            if (renderer == null || renderer.sharedMaterial == null || renderer.sharedMaterial.mainTexture == null || meshCollider == null)
            {
                Debug.Log("NULL");
                return;
            }

            Vector2 pixelUV = hit.textureCoord;
            pixelUV.x *= _tex.width;
            pixelUV.y *= _tex.height;
            // Debug.Log("pixelUV:::" + (int)pixelUV.x + " , " + (int)pixelUV.y);


            Color[] col = new Color[_brush.colors.Length];
            col = _tex.GetPixels((int)pixelUV.x-_brush.brushWidth/2, (int)pixelUV.y-_brush.brushHeight/2, _brush.brushWidth, _brush.brushHeight);
            _brush.UpdateBrushColor(col);
            _tex.SetPixels((int)pixelUV.x - _brush.brushWidth/2, (int)pixelUV.y - _brush.brushHeight/2, _brush.brushWidth, _brush.brushHeight, _brush.colors);
            _tex.Apply();
            renderer.material.mainTexture = _tex;
        }
    }
}